From Murphy’s Law we can deduct that Internet failures always come when you least expect them. In my case, the Stratum 0 wiki was offline for a few minutes (only, thankfully!) when I really urgently(1!11) needed to look something up there. If I only had an offline clone of the wiki…
Enter: Git-Mediawiki
I had already before discovered Git-Mediawiki, which lets you mirror certain
or all pages of a MediaWiki instance to a local Git repository. It achieves
this by implementing the mediawiki:: remote handler, which lets you configure
the URL of the remote MediaWiki instance as a Git remote, and loads the raw
revisions from the MediaWiki API everytime you do a git fetch:
$ git clone mediawiki::https://stratum0.org/mediawiki/
Cloning into 'mediawiki'...
Searching revisions...
No previous mediawiki revision found, fetching from beginning.
Fetching & writing export data by pages...
Listing pages on remote wiki...
6 pages found.
page 1/78: Vorstand
  Found 2 revision(s).
page 2/78: Atomuhr
  Found 15 revision(s).
page 3/78: Corporate Identity
  Found 6 revision(s).
page 4/78: Presse
  Found 2 revision(s).
[...]
1/804: Revision #738 of Presse
2/804: Revision #3036 of Atomuhr
3/804: Revision #3053 of Atomuhr
4/804: Revision #3054 of Atomuhr
[...]
Checking connectivity... done.
Not to mention, this can take a very long time if you try to import a whole wiki
(say, Wikipedia (NO, DON’T ACTUALLY DO THIS! (or at least don’t tell them I told
you how))), but you can also import only single pages or
pages from certain categories with the -c remote.origin.pages=<page list> and
-c remote.origin.categories=<category list> options to git-clone.
After the clone has finished, you can view the raw MediaWiki source files of the pages you imported from your computer. You can even edit them and push the changes back to the wiki if you configure your wiki user account in your Git config!
Since I had already played around with Git-Mediawiki, I had a local mirror of the Stratum 0 wiki on my laptop. Unfortunately, I had not pulled for a few weeks, and the information I needed was only added to the wiki some days ago. So for the future, it would be nice to have an automatically synchronising mirror… And not only one on my personal laptop, but also for other interested users, at least read-only.
Mirroring repositores with gitolite
The best solution for me was a mirror repository on my own server, which was already running gitolite, the popular Git hosting solution. I would simply add a read-only repository in gitolite and let a cron job handle care of automatic synchronisation.
Creating the new repository was easy, you simple add a line to your
gitolite.conf, and when push the changes, gitolite creates the repository for
you. But furthermore, I also wanted to configure the MediaWiki remote directly
in my repository setup, for which I needed to specify the corresponding remote
options for the Git configuration. The appropriate setting to allow
this is in .gitolite.rc (gitolite’s main configuration
file which resides in the gitolite base directory, say /home/git/ in my case),
you can simply add the Git config options you want to set from gitolite.conf
to the $GL_GITCONFIG_KEYS variable. Mine now looks like this:
$GL_GITCONFIG_KEYS = "remote\.* gitweb\.owner gitweb\.description";
Now I could easily add the corresponding options to my repository setup:
repo stratum0-wiki
    config gitweb.description = "Read-only Git mirror of the Stratum 0 wiki"
    config remote.origin.url = "mediawiki::https://stratum0.org/mediawiki"
    config remote.origin.fetch = "+refs/heads/*:refs/remotes/origin/*"
    config remote.origin.fetchstrategy = "by_rev"
    RW+ = rohieb
    R   = @all daemon gitweb
Note that I let Git-Mediawiki work with the by_rev fetch strategy, which
queries the MediaWiki API for all recent revisions rather than first looking for
changed pages and then fetching the revisions accordingly. This is more
efficient since I want to import every revision nonetheless. I also found out
the hard way (i.e. through print debugging) that adding the
remote.origin.fetch option is critical for Git-Mediawiki to work correctly.
Then, a simple cron job for the git user (which owns all the gitolite
repositories), was created with crontab -e to update the mirror every 30
minutes:
# m h  dom mon dow   command
*/30 * * * * /home/git/update-stratum0-mediawiki-mirror
The script which does all the work resides in
/home/git/update-stratum0-mediawiki-mirror:
#!/bin/sh
if [ "`whoami`" != "git" ]; then
    echo "fatal: run as user 'git'."
    exit 1;
fi

cd /home/git/git/stratum0-wiki.git/

git fetch 2>&1 | grep -i 'fatal\|error\|warn'
git update-ref refs/heads/master refs/mediawiki/origin/master
Note that we cannot simply git-merge the master branch here, because the
gitolite repository is a bare repo and git-merge needs a working tree.
Therefore, we only fetch new revisions from our MediaWiki remote (which fetches
to refs/mediawiki/origin/master), and update the master branch manually. Since
the mirror is read-only and there are no real merges to be done, this is
sufficient here.
So far, we have a fully working mirror. But since the Stratum 0 wiki has grown to more than 7000 revisions to date, the initial fetch would need a while. To reduce the load on the MediaWiki API, I figured that I could reuse my existing repository on my laptop.
Re-using a previous Git-Mediawiki repo
So before activating the cron job, I pushed my exiting repository to the mirror:
~/stratum0-wiki$ git push rohieb.name master
~/stratum0-wiki$ git push rohieb.name refs/mediawiki/origin/master
A test run of the mirror script however was not happy with that and wanted to
fetch ALL THE revisions anyway. So it took me another while to find out that for
efficiency reasons, Git-Mediawiki stores the corresponding MediaWiki revisions
in Git notes under refs/notes/origin/mediawiki. For example:
$ git log --notes=refs/notes/origin/mediawiki
commit 7e486fa8a463ebdd177e92689e45f756c05d232f
Author: Daniel Bohrer <Daniel Bohrer@stratum0.org/mediawiki>
Date:   Sat Mar 15 14:42:09 2014 +0000

    /* Talks am Freitag, 14. März 2014, 19:00 */ format, youtube-links

Notes (origin/mediawiki):
    mediawiki_revision: 7444

[...]
So after I also pushed refs/notes/origin/mediawiki to the mirror repo,
everything was fine and a the cron job only fetched a small amount of new
revisions.
Conclusion
To conclude this post, I have now a working MediaWiki mirror for the Stratum 0 wiki, which uses a cron job and Git-Mediawiki to fetch new revisions every 30 minutes, integrated with gitolite for hosting. If you also want to keep track of changes in the wiki and have an offline mirror for reference, feel free to pull from git://git.rohieb.name/stratum0-wiki.git.
As I’m currently working to get a master’s degree in university, I had to write
a seminar paper. I got lucky and the topic “Chatty Things – Making the Internet
of Things Readily Usable with XMPP” sounded very interesting to me  As the
title suggests, the paper describes how the XMPP protocol can be employed to
facilitate user access to smart devices in the Internet of Things, and
some thoughts on preventing information overflow on the user. If this sounds
interesting to you as well, you should read my paper or scroll through the
presentation slides
As the
title suggests, the paper describes how the XMPP protocol can be employed to
facilitate user access to smart devices in the Internet of Things, and
some thoughts on preventing information overflow on the user. If this sounds
interesting to you as well, you should read my paper or scroll through the
presentation slides  The paper is licensed as CC BY-ND 3.0
(of course, you shouldn’t use it for your own paper :P), the presentation
slides are CC BY-SA 3.0, and if you want to re-use it, have a look at
the LATEX code.
The paper is licensed as CC BY-ND 3.0
(of course, you shouldn’t use it for your own paper :P), the presentation
slides are CC BY-SA 3.0, and if you want to re-use it, have a look at
the LATEX code.
Apart from the matter handled in the paper, I also acquired some additional skills:
- Learn to motivate myself. The Pomodoro technique, in conjunction with chocolatey sweets for extrinsic gratification, seems to work quite well for me.
- Learn to use TikZ to draw figures in LATEX. I already wanted to use it for a while, but it seemed complex and have a steep learning curve. It turns out that the TikZ/PGF manual is very illustrative, and has an exhaustive index for easy skimming.
- Learn to deliver a good(?) talk. I recently discovered speaking.io by Zach Holman, and apparently the tips he gives there seem to work and I felt much more secure than on previous talks. Also: a lot of practice. And test sessions. And I ditched his advice on slide design, I like my slides with latex-beamer :P
In my last post, I used ikiwiki‘s highlight plugin to highlight PDF files. But since the underlying highlight library did not support highlighting for PDF files yet, I had to write my own highlighting definition. Due to limitiations in the library, it's not perfect; for example, it does not highlight things inside streams, but in case you’re interested, you can get the source:
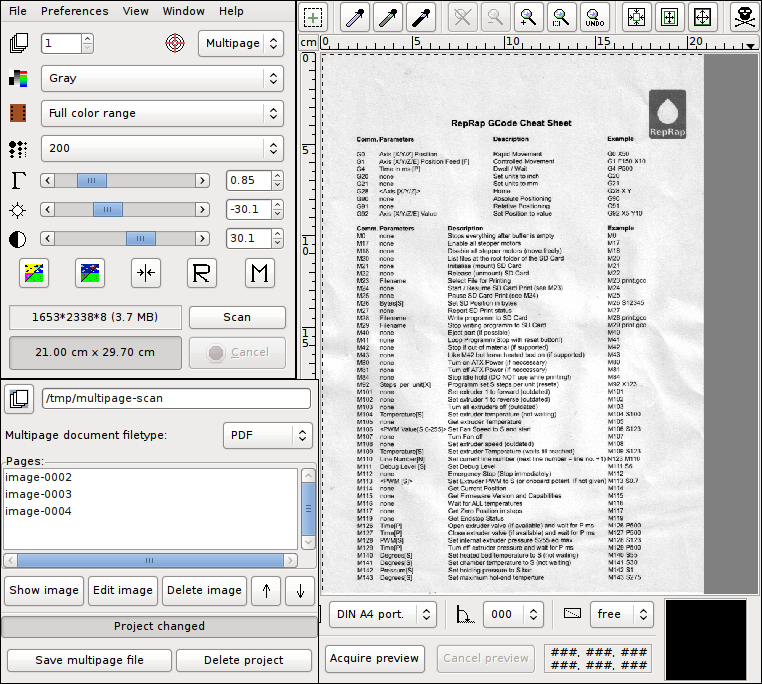
Problem
I use XSane to scan documents for my digital archive. I want them to be in PDF format and have a reasonable resolution (better than 200 dpi, so I can try OCRing them afterwards). However, the PDFs created by XSane’s multipage mode are too large, about 250 MB for a 20-page document scanned at 200 dpi.
 |
First (non-optimal) solution
At first, I tried to optimize the PDF using GhostScript. I
already wrote about how GhostScript’s
-dPDFSETTINGS option can be used to minimize PDFs by redering the pictures to
a smaller resolution. In fact, there are multiple rendering modes
(screen for 96 dpi, ebook for 150 dpi, printer for 300 dpi,
and prepress for color-preserving 300 dpi), but they are pre-defined, and
for my 200 dpi images, ebook was not enough (I would lose resolution),
while printer was too high and would only enlarge the PDF.
Interlude: PDF Internals
The best thing to do was to find out how the images were embedded in the PDF. Since most PDF files are also partly human-readable, I opened my file with vim. (Also, I was surprised that vim has syntax highlighting for PDF.) Before we continue, I'll give a short introduction to the PDF file format (for the long version, see Adobe’s PDF reference).
Building Blocks
Every PDF file starts with the magic string that identifies the version
of the standard which the document conforms to, like %PDF-1.4. After that, a
PDF document is made up of the following objects:
- Boolean values
-
trueandfalse - Integers and floating-point numbers
-
for example,
1337,-23.42and.1415 - Strings
-
- interpreted as literal characters when enclosed in parentheses:
(This
is a string.)
These can contain escaped characters, particularly escaped closing braces and control characters:(This string contains a literal \) and some\n newlines.\n). - interpreted as hexadecimal data when enclosed in angled brackets:
<53 61 6D 70 6C 65>equals(Sample).
- interpreted as literal characters when enclosed in parentheses:
- Names
-
starting with a forward slash, like
/Type. You can think of them like identifiers in programming languages. - Arrays
-
enclosed in square brackets:
[ -1 4 6 (A String) /AName [ (strings in arrays in arrays!) ] ] - Dictionaries
-
key-value stores, which are enclosed in double angled brackets. The key must
be a name, the value can be any object. Keys and values are given in turns,
beginning with the first key:
<< /FirstKey (First Value) /SecondKey 3.14 /ThirdKey /ANameAsValue >>Usually, the first key is/Typeand defines what the dictionary actually describes. - Stream Objects
- a collection of bytes. In contrast to strings, stream objects are usually used for large amount of data which may not be read entirely, while strings are always read as a whole. For example, streams can be used to embed images or metadata.
-
Streams consist of a dictionary, followed by the keyword
stream, the raw content of the stream, and the keywordendstream. The dictionary describes the stream’s length and the filters that have been applied to it, which basically define the encoding the data is stored in. For example, data streams can be compressed with various algorithms. - The Null Object
-
Represented by the literal string
null. - Indirect Objects
- Every object in a PDF document can also be stored as a indirect object, which means that it is given a label and can be used multiple times in the document. The label consists of two numbers, a positive object number (which makes the object unique) and a non-negative generation number (which allows to incrementally update objects by appending to the file).
-
Indirect objects are defined by their object number, followed by their
generation number, the keyword
obj, the contents of the object, and the keywordendobj. Example:1 0 obj (I'm an object!) endobjdefines the indirect object with object number 1 and generation number 0, which consists only of the string “I'm an object!”. Likewise, more complex data structures can be labeled with indirect objects. -
Referencing an indirect object works by giving the object and generation
number, followed by an uppercase R:
1 0 Rreferences the object created above. References can be used everywhere where a (direct) object could be used instead.
Using these object, a PDF document builds up a tree structure, starting from the
root object, which has the object number 1 and is a dictionary with the value
/Catalog assigned to the key /Type. The other values of this dictionary
point to the objects describing the outlines and pages of the document, which in
turn reference other objects describing single pages, which point to objects
describing drawing operations or text blocks, etc.
Dissecting the PDFs created by XSane
Now that we know how a PDF document looks like, we can go back to out initial problem and try to find out why my PDF file was so huge. I will walk you through the PDF object by object.
%PDF-1.4

1 0 obj
   << /Type /Catalog
      /Outlines 2 0 R
      /Pages 3 0 R
   >>
endobj
This is just the magic string declaring the document as PDF-1.4, and the root object with object number 1, which references objects number 2 for Outlines and number 3 for Pages. We're not interested in outlines, let's look at the pages.
3 0 obj
   << /Type /Pages
      /Kids [
             6 0 R
             8 0 R
             10 0 R
             12 0 R
            ]
      /Count 4
   >>
endobj
OK, apparently this document has four pages, which are referenced by objects number 6, 8, 10 and 12. This makes sense, since I scanned four pages ;-)
Let's start with object number 6:
6 0 obj
    << /Type /Page
       /Parent 3 0 R
       /MediaBox [0 0 596 842]
       /Contents 7 0 R
       /Resources << /ProcSet 8 0 R >>
    >>
endobj
We see that object number 6 is a page object, and the actual content is in object number 7. More redirection, yay!
7 0 obj
    << /Length 2678332     >>
stream
q
1 0 0 1 0 0 cm
1.000000 0.000000 -0.000000 1.000000 0 0 cm
595.080017 0 0 841.679993 0 0 cm
BI
  /W 1653
  /H 2338
  /CS /G
  /BPC 8
  /F /FlateDecode
ID
x$¼[$;¾åù!fú¥¡aæátq.4§ [ ...byte stream shortened... ]
EI
Q
endstream
endobj
Aha, here is where the magic happens. Object number 7 is a stream object of 2,678,332 bytes (about 2 MB) and contains drawing operations! After skipping around a bit in Adobe’s PDF reference (chapters 3 and 4), here is the annotated version of the stream content:
q                 % Save drawing context
1 0 0 1 0 0 cm    % Set up coordinate space for image
1.000000 0.000000 -0.000000 1.000000 0 0 cm
595.080017 0 0 841.679993 0 0 cm
BI                % Begin Image
  /W 1653           % Image width is 1653 pixel
  /H 2338           % Image height is 2338 pixel
  /CS /G            % Color space is Gray
  /BPC 8            % 8 bits per pixel
  /F /FlateDecode   % Filters: data is Deflate-compressed
ID                % Image Data follows:
x$¼[$;¾åù!fú¥¡aæátq.4§ [ ...byte stream shortened... ]
EI                % End Image
Q                 % Restore drawing context
So now we know why the PDF was so huge: the line /F /FlateDecode tells us that
the image data is stored losslessly with Deflate compression (this is
basically what PNG uses). However, scanned images, as well as photographed
pictures, have the tendency to become very big when stored losslessly, due to te
fact that image sensors always add noise from the universe and lossless
compression also has to take account of this noise. In contrast, lossy
compression like JPEG, which uses discrete cosine transform, only has to
approximate the image (and therefore the noise from the sensor) to a certain
degree, therefore reducing the space needed to save the image. And the PDF
standard also allows image data to be DCT-compressed, by adding /DCTDecode to
the filters.
Second solution: use a (better) compression algorithm
Now that I knew where the problem was, I could try to create PDFs with DCT
compression. I still had the original, uncompressed PNM files that fell out
of XSane’ multipage mode (just look in the multipage project folder), so I
started to play around a bit with ImageMagick’s convert tool, which can
also convert images to PDF.
Converting PNM to PDF
First, I tried converting the umcompressed PNM to PDF:
$ convert image*.pnm document.pdf
convert generally takes parameters of the form inputfile outputfile, but it
also allows us to specify more than one input file (which is somehow
undocumented in the man page). In that case it tries to create
multi-page documents, if possible. With PDF as output format, this results in
one input file per page.
The embedded image objects looked somewhat like the following:
8 0 obj
<<
    /Type /XObject
    /Subtype /Image
    /Name /Im0
    /Filter [ /RunLengthDecode ]
    /Width 1653
    /Height 2338
    /ColorSpace 10 0 R
    /BitsPerComponent 8
    /Length 9 0 R
>>
stream
% [ raw byte data ]
endstream
The filter /RunLengthDecode indicates that the stream data is compressed with
Run-length encoding, another simple lossless compression. Not what I
wanted. (Apart from that, convert embeds images as XObjects, but there is not
much difference to the inline images described above.)
Converting PNM to JPG, then to PDF
Next, I converted the PNMs to JPG, then to PDF.
$ convert image*.pnm image.jpg
$ convert image*jpg document.pdf
(The first command creates the output files image-1.jpg, image-2.jpg, etc.,
since JPG does not support multiple pages in one file.)
When looking at the PDF, we see that we now have DCT-compressed images inside the PDF:
8 0 obj
<<
    /Type /XObject
    /Subtype /Image
    /Name /Im0
    /Filter [ /DCTDecode ]
    /Width 1653
    /Height 2338
    /ColorSpace 10 0 R
    /BitsPerComponent 8
    /Length 9 0 R
>>
stream
% [ raw byte data ]
endstream
Converting PNM to JPG, then to PDF, and fix page size
However, the pages in document.pdf are 82.47×58.31 cm, which results in
about 72 dpi in respect to the size of the original images. But convert
also allows us to specify the pixel density, so we'll set that to 200 dpi
in X and Y direction, which was the resolution at which the images were scanned:
$ convert image*jpg -density 200x200 document.pdf
Update: You can also use the -page parameter to set the page size
directly. It takes a multitude of predefined paper formats (see link) and will
do the pixel density calculation for you, as well as adding any neccessary
offset if the image ratio is not quite exact:
$ convert image*jpg -page A4 document.pdf
With that approach, I could reduce the size of my PDF from 250 MB with losslessly compressed images to 38 MB with DCT compression.
Another update (2023): Marcus notified me that it is possible to use
ImageMagick's -compress jpeg option, this way we can leave out the
intermediate step and convert PNM to PDF directly:
$ convert image*.pnm -compress jpeg -quality 85 output.pdf
You can also play around with the -quality parameter to set the JPEG
compression level (100% makes almost pristine, but huge images; 1% makes very
small, very blocky images), 85% should still be readable for most documents
in that resolution.
Too long, didn’t read
Here’s the gist for you:
- Read the article above, it’s very comprehensive :P
Use
converton XSane’s multipage images and specify your scanning resolution:$ convert image*.pnm image.jpg $ convert image*jpg -density 200x200 document.pdf
Further reading
There is probably software out there which does those thing for you, with a
shiny user interface, but I could not find one quickly. What I did find though,
was this detailed article, which describes how to get
high-resolution scans wihh OCR information in PDF/A and DjVu format, using
scantailor and unpaper.
Also, Didier Stevens helped me understand stream objects in in his
illustrated blogpost. He seems to write about PDF more
often, and it was fun to poke around in his blog. There is also a nice script,
pdf-parser, which helps you visualize the structure of a PDF
document.
Problem
I was debugging a program, which suddenly died with
QFATAL : TestEdge::testSaveRemove() Received signal 11
For better understanding of the problem, it would be nice to know what the meaning of “signal 11” is.
Solution
I was not so fluent in signal numbers (maybe I should take a
course). Of course, I could dig in the signal(7) man
page, or in the respective C header (signal.h). However,
while digging in the manpages, I noticed that kill(1) does not only
kill processes, but also does exactly what I want.[^1] Citing from the
man page:
-l, --list [signal]
  List  signal  names.   This  option has optional argument, which
  will convert signal number to signal name, or other way round.
[^1]: At least the version in Debian, which is from procps
So I could just say:
$ kill -l 11
SEGV
Ah, segmentation fault. Nice to know
In addition, the man page also mentions a useful parameter -L, which
prints a nice table of signal numbers and mnemonics:
$ /bin/kill -L
 1 HUP      2 INT      3 QUIT     4 ILL      5 TRAP     6 ABRT  7 BUS
 8 FPE      9 KILL    10 USR1    11 SEGV    12 USR2    13 PIPE 14 ALRM
15 TERM    16 STKFLT  17 CHLD    18 CONT    19 STOP    20 TSTP 21 TTIN
22 TTOU    23 URG     24 XCPU    25 XFSZ    26 VTALRM  27 PROF 28 WINCH
29 POLL    30 PWR     31 SYS
(Also, the man page also warns about kill probably being a shell
built-in. At least the Bash and zsh built-ins also know -l, but not
-L, so you have to call /bin/kill explicitly.)
Problem: I just bought Portal for Linux. When I start the game on my AMD64 laptop with Debian testing, I only see black objects, and a few light stripes in between. Everything else works, I can hear sound, I can interact with objects, and I can look and around, in which case the stripes also move in the right directions, so they seem to be speckles or reflections rendered on objects, and only the textures are missing.
Solution: Searching the Steam forums resulted in nothing (who would have
guessed), but this forum post suggested to update Mesa to version 9.2
and install libtxc-dxtn or libtxc-dxtn-s2tc0. This packages were not
installed on my system, and the description for the package says that it is used
for texture compression, so it seems to be related. So I first tried to install
the i386 version:
aptitude install libtxc-dxtn-s2tc0 libtxc-dxtn-s2tc0:i386
After restarting Portal, the problem was gone, so I refrained from updating my
Mesa
Before and after images (probably Copyright by Valve, but I consider this to be fair use):
 |
 |
Sooo. You might already have noticed that I moved my blag from wordpress.com to my own domain. There were several reasons for that, which also kept me from blogging actively. At first, WordPress seemed like a good solution for beginners, and since I didn’t want to set up my own (probably buggy) instance, a hosted blog at WordPress.com seemed like the best solution to get started with blogging.
However, the free plan at WordPress.com does not allow very much customization:
you can choose from a few themes, but you can neither edit the underlying HTML framework of the page, nor is is
possible to do a little CSS
tweaking. For example, I like my <code> tags with a little
darker background so they become more distinguished from the remaining text and
so you can easily see what you have to type on your keyboard and what not.
Also, I had to write blogposts in my browser. I’m not a big fan of the idea that
the browser should become an “operating system” for the web
cloud. My computer is more than a dumb terminal for the web, I like my terminals
and my offline applications and distributed workflows. In most cases, I find
distributed workflows much more flexible, and you can choose if and when you
want to lose control over your data to the cloud. And, without question, I lost
more than one draft to browser crashes (admittedly, Firefox got a lot more
stable since then), accidentally closed tabs and timed out login sessions. And
WordPress tends to be overloaded with complex page layouts and JavaScript, which
makes everything soooo slooooow…
So it seemed obvious to move my blog to my existing site, which already runs on
ikiwiki. For those who do not know ikiwiki, it is a static site generator
which takes Markdown[^1] files as input and spits out static HTML pages. It
works good in combination with Git (a distributed version control system,
which I use all day anyway), which makes it possible to write and preview every
page on your own computer, using your favourite editor, offline (in fact I’m
writing this post from a laundrette), and when everything is finished (and you
have Internet access), you push it to your server, where everything is rendered.
There is also an easy way to aggregate multiple pages to a blog,
including the automatic generation of RSS and Atom feeds. Also I have full
control over the CSS (which will probably still change in the next
few weeks) and the templates used to render the HTML files. For example, I
have hacked together a little plugin to support Flattr buttons
and integrated it into the template which is used to render the blog posts.
There is even a dynamic part of ikiwiki which allows users to add comments, I
may or may not try that in the future and convert all the WordPress comments.
And finally, if you want, you can read the full source code of every page
The move to ikiwiki was already in my head a long time, so I started writing new blogposts in Markdown right away, so they started piling up on my disk. Now that I have the new setup, I already have content to fill the next few weeks, so stay tuned!
Update: In this process I was also moving the site to a new server, which also provides IPv6 connectivity:
$ dig -t AAAA rohieb.name

; <<>> DiG 9.8.4-rpz2+rl005.12-P1 <<>> -t AAAA rohieb.name
;; global options: +cmd
;; Got answer:
;; ->>HEADER<<- opcode: QUERY, status: NOERROR, id: 64670
;; flags: qr rd ra; QUERY: 1, ANSWER: 1, AUTHORITY: 0, ADDITIONAL: 0

;; QUESTION SECTION:
;rohieb.name.               IN  AAAA


;; ANSWER SECTION:
rohieb.name.        2629    IN  AAAA    2a03:4000:2:2f3::1

;; Query time: 3 msec
;; SERVER: 192.168.148.1#53(192.168.148.1)
;; WHEN: Tue Oct 29 04:33:03 2013
;; MSG SIZE  rcvd: 57
[^1]: Though I’m using MultiMarkdown for most pages, which is a superset of Markdown with additional features (like footnotes). But ikiwiki also supports other markup languages, e.g. reStructuredText or Textile.
Today I stumbled over a lengthy patch on my harddisk. It was about half a year
old, and consisted of only one hunk, which was about 1000 lines in length. Most
of the contents were indentation changes from tabs to spaces, but I knew that
the patch contained a small useful portion, which I wanted to extract. What was
slightly more annoying was the fact the the patch did not apply cleanly to the
file it was supposed to change, and patch only applies hunks atomically, the
whole patch was rejected.
Since I did not want to compare each of the lines in the patch visually and decide whether they changed only whitespace, I tried to look for a way to split the patch into smaller hunks. My first try was looking at the useful tool in the patchutils package, but none of them did what I wanted, they only allowed me to split patches into single hunks (but my patch already had only one hunk).
But after a bit of googling, I found out that Emacs has a
diff-split-hunk command, so I installed Emacs (for the first time
in my life), opened my patch, selected Emacs' Diff mode with M-x diff-mode,
and split the patch into smaller hunks by pressing C-x C-s on appropriate
context lines. After saving, the patch applied cleanly except for two smaller
hunks, which I could easily identify as containing only whitespace changes. Then
I could compare my patched file with the original file, this time ignoring
whitespace changes with diff -w, and, voilà, I got the seven useful lines I
wanted.
For illustration, see the different edit stages of my patch on a separate page.
If you have a PDF file and want it to be in a specific PDF version (for example, the print shop where you just ordered some adhesive labels wants the print master in PDF 1.3, but your Inkscape only exports PDF 1.4), Ghostscript can help:
gs -sDEVICE=pdfwrite -dCompatibilityLevel=1.5 -dNOPAUSE -dQUIET \
  -dBATCH -sOutputFile=new-pdf1.5.pdf original.pdf
(this converts the file original.pdf to PDF 1.5 and writes it to
new-pdf1.5.pdf)
Also, if you have a huge PDF of several megabyte because there are many
high-resolution pictures in it, Ghostscript can minify it (and shrink
the pictures to 96 dpi) if you use the parameter
-dPDFSETTINGS=/screen.
Everytime I was using my wireless USB keyboard with my laptop while the power cable was not connected, the keyboard behaviour was lousy, and keystrokes tend to be delayed by several seconds. The kernel logs said something like
[23302.802096] uhci_hcd 0000:00:1a.0: setting latency timer to 64
[23302.842177] uhci_hcd 0000:00:1a.1: PCI INT B -> GSI 21 (level, low) -> IRQ 21
[23302.842190] uhci_hcd 0000:00:1a.1: setting latency timer to 64
[23302.882145] uhci_hcd 0000:00:1a.2: PCI INT C -> GSI 19 (level, low) -> IRQ 19
[23302.882158] uhci_hcd 0000:00:1a.2: setting latency timer to 64
[23302.929065] uhci_hcd 0000:00:1d.1: PCI INT B -> GSI 19 (level, low) -> IRQ 19
[23302.929079] uhci_hcd 0000:00:1d.1: setting latency timer to 64
Searching on Google, I found a forum post which suggested to
disable USB auto-suspend in the laptop-mode configuration files.
The relevant file on my Ubuntu 12.04 is
/etc/laptop-mode/conf.d/usb-autosuspend.conf, which is fairly well
documented, and has an option AUTOSUSPEND_USBID_BLACKLIST which
allowed me to blacklist my USB keyboard, so the device was no longer put
in auto-suspend mode. (The USB ID needed for
AUTOSUSPEND_USBID_BLACKLIST can be found in the output of lsusb)
After editing that file, I had to restart the laptop-mode daemon (sudo
/etc/init.d/laptop-mode restart), and keystrokes from my wireless
keyboard arrived again without any delay.