Problem
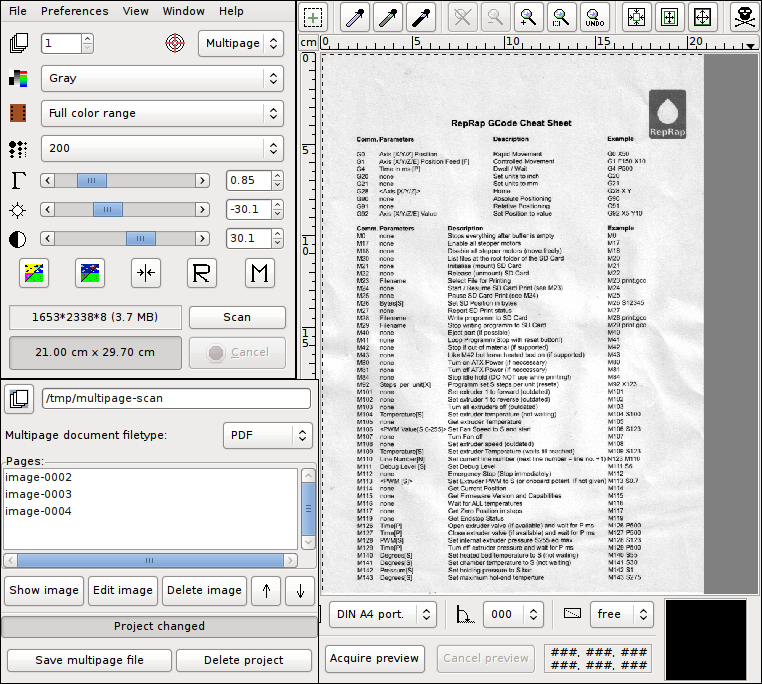
I use XSane to scan documents for my digital archive. I want them to be in PDF format and have a reasonable resolution (better than 200 dpi, so I can try OCRing them afterwards). However, the PDFs created by XSane’s multipage mode are too large, about 250 MB for a 20-page document scanned at 200 dpi.
 |
First (non-optimal) solution
At first, I tried to optimize the PDF using GhostScript. I
already wrote about how GhostScript’s
-dPDFSETTINGS option can be used to minimize PDFs by redering the pictures to
a smaller resolution. In fact, there are multiple rendering modes
(screen for 96 dpi, ebook for 150 dpi, printer for 300 dpi,
and prepress for color-preserving 300 dpi), but they are pre-defined, and
for my 200 dpi images, ebook was not enough (I would lose resolution),
while printer was too high and would only enlarge the PDF.
Interlude: PDF Internals
The best thing to do was to find out how the images were embedded in the PDF. Since most PDF files are also partly human-readable, I opened my file with vim. (Also, I was surprised that vim has syntax highlighting for PDF.) Before we continue, I'll give a short introduction to the PDF file format (for the long version, see Adobe’s PDF reference).
Building Blocks
Every PDF file starts with the magic string that identifies the version
of the standard which the document conforms to, like %PDF-1.4. After that, a
PDF document is made up of the following objects:
- Boolean values
-
trueandfalse - Integers and floating-point numbers
-
for example,
1337,-23.42and.1415 - Strings
-
- interpreted as literal characters when enclosed in parentheses:
(This
is a string.)
These can contain escaped characters, particularly escaped closing braces and control characters:(This string contains a literal \) and some\n newlines.\n). - interpreted as hexadecimal data when enclosed in angled brackets:
<53 61 6D 70 6C 65>equals(Sample).
- interpreted as literal characters when enclosed in parentheses:
- Names
-
starting with a forward slash, like
/Type. You can think of them like identifiers in programming languages. - Arrays
-
enclosed in square brackets:
[ -1 4 6 (A String) /AName [ (strings in arrays in arrays!) ] ] - Dictionaries
-
key-value stores, which are enclosed in double angled brackets. The key must
be a name, the value can be any object. Keys and values are given in turns,
beginning with the first key:
<< /FirstKey (First Value) /SecondKey 3.14 /ThirdKey /ANameAsValue >>Usually, the first key is/Typeand defines what the dictionary actually describes. - Stream Objects
- a collection of bytes. In contrast to strings, stream objects are usually used for large amount of data which may not be read entirely, while strings are always read as a whole. For example, streams can be used to embed images or metadata.
-
Streams consist of a dictionary, followed by the keyword
stream, the raw content of the stream, and the keywordendstream. The dictionary describes the stream’s length and the filters that have been applied to it, which basically define the encoding the data is stored in. For example, data streams can be compressed with various algorithms. - The Null Object
-
Represented by the literal string
null. - Indirect Objects
- Every object in a PDF document can also be stored as a indirect object, which means that it is given a label and can be used multiple times in the document. The label consists of two numbers, a positive object number (which makes the object unique) and a non-negative generation number (which allows to incrementally update objects by appending to the file).
-
Indirect objects are defined by their object number, followed by their
generation number, the keyword
obj, the contents of the object, and the keywordendobj. Example:1 0 obj (I'm an object!) endobjdefines the indirect object with object number 1 and generation number 0, which consists only of the string “I'm an object!”. Likewise, more complex data structures can be labeled with indirect objects. -
Referencing an indirect object works by giving the object and generation
number, followed by an uppercase R:
1 0 Rreferences the object created above. References can be used everywhere where a (direct) object could be used instead.
Using these object, a PDF document builds up a tree structure, starting from the
root object, which has the object number 1 and is a dictionary with the value
/Catalog assigned to the key /Type. The other values of this dictionary
point to the objects describing the outlines and pages of the document, which in
turn reference other objects describing single pages, which point to objects
describing drawing operations or text blocks, etc.
Dissecting the PDFs created by XSane
Now that we know how a PDF document looks like, we can go back to out initial problem and try to find out why my PDF file was so huge. I will walk you through the PDF object by object.
%PDF-1.4

1 0 obj
   << /Type /Catalog
      /Outlines 2 0 R
      /Pages 3 0 R
   >>
endobj
This is just the magic string declaring the document as PDF-1.4, and the root object with object number 1, which references objects number 2 for Outlines and number 3 for Pages. We're not interested in outlines, let's look at the pages.
3 0 obj
   << /Type /Pages
      /Kids [
             6 0 R
             8 0 R
             10 0 R
             12 0 R
            ]
      /Count 4
   >>
endobj
OK, apparently this document has four pages, which are referenced by objects number 6, 8, 10 and 12. This makes sense, since I scanned four pages ;-)
Let's start with object number 6:
6 0 obj
    << /Type /Page
       /Parent 3 0 R
       /MediaBox [0 0 596 842]
       /Contents 7 0 R
       /Resources << /ProcSet 8 0 R >>
    >>
endobj
We see that object number 6 is a page object, and the actual content is in object number 7. More redirection, yay!
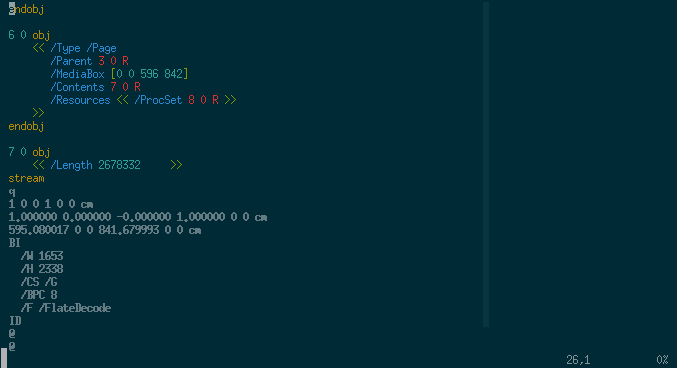
7 0 obj
    << /Length 2678332     >>
stream
q
1 0 0 1 0 0 cm
1.000000 0.000000 -0.000000 1.000000 0 0 cm
595.080017 0 0 841.679993 0 0 cm
BI
  /W 1653
  /H 2338
  /CS /G
  /BPC 8
  /F /FlateDecode
ID
x$¼[$;¾åù!fú¥¡aæátq.4§ [ ...byte stream shortened... ]
EI
Q
endstream
endobj
Aha, here is where the magic happens. Object number 7 is a stream object of 2,678,332 bytes (about 2 MB) and contains drawing operations! After skipping around a bit in Adobe’s PDF reference (chapters 3 and 4), here is the annotated version of the stream content:
q                 % Save drawing context
1 0 0 1 0 0 cm    % Set up coordinate space for image
1.000000 0.000000 -0.000000 1.000000 0 0 cm
595.080017 0 0 841.679993 0 0 cm
BI                % Begin Image
  /W 1653           % Image width is 1653 pixel
  /H 2338           % Image height is 2338 pixel
  /CS /G            % Color space is Gray
  /BPC 8            % 8 bits per pixel
  /F /FlateDecode   % Filters: data is Deflate-compressed
ID                % Image Data follows:
x$¼[$;¾åù!fú¥¡aæátq.4§ [ ...byte stream shortened... ]
EI                % End Image
Q                 % Restore drawing context
So now we know why the PDF was so huge: the line /F /FlateDecode tells us that
the image data is stored losslessly with Deflate compression (this is
basically what PNG uses). However, scanned images, as well as photographed
pictures, have the tendency to become very big when stored losslessly, due to te
fact that image sensors always add noise from the universe and lossless
compression also has to take account of this noise. In contrast, lossy
compression like JPEG, which uses discrete cosine transform, only has to
approximate the image (and therefore the noise from the sensor) to a certain
degree, therefore reducing the space needed to save the image. And the PDF
standard also allows image data to be DCT-compressed, by adding /DCTDecode to
the filters.
Second solution: use a (better) compression algorithm
Now that I knew where the problem was, I could try to create PDFs with DCT
compression. I still had the original, uncompressed PNM files that fell out
of XSane’ multipage mode (just look in the multipage project folder), so I
started to play around a bit with ImageMagick’s convert tool, which can
also convert images to PDF.
Converting PNM to PDF
First, I tried converting the umcompressed PNM to PDF:
$ convert image*.pnm document.pdf
convert generally takes parameters of the form inputfile outputfile, but it
also allows us to specify more than one input file (which is somehow
undocumented in the man page). In that case it tries to create
multi-page documents, if possible. With PDF as output format, this results in
one input file per page.
The embedded image objects looked somewhat like the following:
8 0 obj
<<
    /Type /XObject
    /Subtype /Image
    /Name /Im0
    /Filter [ /RunLengthDecode ]
    /Width 1653
    /Height 2338
    /ColorSpace 10 0 R
    /BitsPerComponent 8
    /Length 9 0 R
>>
stream
% [ raw byte data ]
endstream
The filter /RunLengthDecode indicates that the stream data is compressed with
Run-length encoding, another simple lossless compression. Not what I
wanted. (Apart from that, convert embeds images as XObjects, but there is not
much difference to the inline images described above.)
Converting PNM to JPG, then to PDF
Next, I converted the PNMs to JPG, then to PDF.
$ convert image*.pnm image.jpg
$ convert image*jpg document.pdf
(The first command creates the output files image-1.jpg, image-2.jpg, etc.,
since JPG does not support multiple pages in one file.)
When looking at the PDF, we see that we now have DCT-compressed images inside the PDF:
8 0 obj
<<
    /Type /XObject
    /Subtype /Image
    /Name /Im0
    /Filter [ /DCTDecode ]
    /Width 1653
    /Height 2338
    /ColorSpace 10 0 R
    /BitsPerComponent 8
    /Length 9 0 R
>>
stream
% [ raw byte data ]
endstream
Converting PNM to JPG, then to PDF, and fix page size
However, the pages in document.pdf are 82.47×58.31 cm, which results in
about 72 dpi in respect to the size of the original images. But convert
also allows us to specify the pixel density, so we'll set that to 200 dpi
in X and Y direction, which was the resolution at which the images were scanned:
$ convert image*jpg -density 200x200 document.pdf
Update: You can also use the -page parameter to set the page size
directly. It takes a multitude of predefined paper formats (see link) and will
do the pixel density calculation for you, as well as adding any neccessary
offset if the image ratio is not quite exact:
$ convert image*jpg -page A4 document.pdf
With that approach, I could reduce the size of my PDF from 250 MB with losslessly compressed images to 38 MB with DCT compression.
Another update (2023): Marcus notified me that it is possible to use
ImageMagick's -compress jpeg option, this way we can leave out the
intermediate step and convert PNM to PDF directly:
$ convert image*.pnm -compress jpeg -quality 85 output.pdf
You can also play around with the -quality parameter to set the JPEG
compression level (100% makes almost pristine, but huge images; 1% makes very
small, very blocky images), 85% should still be readable for most documents
in that resolution.
Too long, didn’t read
Here’s the gist for you:
- Read the article above, it’s very comprehensive :P
Use
converton XSane’s multipage images and specify your scanning resolution:$ convert image*.pnm image.jpg $ convert image*jpg -density 200x200 document.pdf
Further reading
There is probably software out there which does those thing for you, with a
shiny user interface, but I could not find one quickly. What I did find though,
was this detailed article, which describes how to get
high-resolution scans wihh OCR information in PDF/A and DjVu format, using
scantailor and unpaper.
Also, Didier Stevens helped me understand stream objects in in his
illustrated blogpost. He seems to write about PDF more
often, and it was fun to poke around in his blog. There is also a nice script,
pdf-parser, which helps you visualize the structure of a PDF
document.